Showing posts with label Crafty. Show all posts

Wednesday, December 10, 2014

Hot Cocoa on a Stick


This recipe uses the microwave fudge recipe that is so awesome! 

Supplies needed:
lollipop sticks
jumbo marshmallows
fudge blocks

Ingredients for fudge:
3 cups semi sweet chocolate chips
1 can of condensed milk
3 tbsp butter
1 tsp vanilla
1 tsp salt (I use Himalayan Pink Salt)

Directions:
Line 8x8 (mine us actually 8x10) baking dish with foil and spray with cooking spray. Both of these steps are important - you will be sorry if you don't!
Next, put chocolate chips, condensed milk and butter in a microwave safe bowl and heat for 60 seconds. I do mine on half power to be on the safe side. Take out and stir. Do again for 30 seconds and stir for awhile to see if the heat from the bowl will melt the rest of the chips. Sometimes I need another 30 seconds. I don't do for more than 2 minutes total because the chocolate will burn. After they are melted, add in vanilla and salt.  
Pout into baking dish and refrigerate. Mine usually take about 4 hours before I can dump out and cut into squares.

After squares are cut, pierce a marshmallow and fudge block on a stick. If saving to give away or use later, use treat pop bags and pipe cleaners to wrap up individually.  I use the cake pop bags at Michael's for just about everything.

Tuesday, December 09, 2014

Apple Wreath

I forgot to share this post in August - I made this for MK's teacher. Here's what you'll need:

pool noodle (and shipping or duct tape to make it a circle)
red burlap ribbon
giant scrabble tiles from JoAnn's
green burlap ribbon
brown burlap ribbon
hot glue


Saturday, July 19, 2014

Momo's Repurposed Nursery

I had a lot of fun doing Mo's nursery. This room was what I envisioned originally making a nursery before we knew there were two babies on their way and space just wouldn't allow us to do this room.  I had planned on keeping the twins together until they were about 2, but Mo wakes up hollering for food and her paci so much it was waking David.  So, we eliminated our guest room (most people are scared to visit anyway LOL), and got a futon for the playroom so Mo could have her own room to holler all she wanted. Here are the different parts of her 95% repurposed nursery.

Repurposed canvas and handmedown crib.

Painted chest redone from guest room set, repainted picture board that was originally brown and in MK's room over her crib and handmedown changing table. The gray quatrefoil rug is the only item that is new in the nursery. The lamp was in the guest room.

Vintage step ladder to display stuffed animals and cover a messed up phone outlet :)

Frame that I painted and added wires to to create a bow board. The chest was painted for the twins' original room and was given to us by a friend. I painted it, and added chalk labels. The jar was a clearance jar from Michael's in the original nursery. It holds headbands.

Repainted nightstand from guest room set. Madeline doll and name frame was decor from original twins' nursery. The onesie tutu set was on a burlap board with David's blue onesie and baseball cap that we used as their gender announcement.  That burlap piece is now the chevron-covered piece with the M above the crib.

Close up of the picture board. The letters will probably come down soon - they were strung with a ribbon over Mo's crib in the original twin nursery.

Shelves are painted shutters I found at an antique store, with brackets from Hobby Lobby added to them. They were in the guest room, and just moved around for the nursery.


Tutu Bed Skirt


So I found out I am allergic to tulle through this project. Probably won't stop me from making a ton of tutus in my life though. Anyway, I ordered 40 years for this 6-foot strip. Below you can see a cheap tension rod and the bolt of tulle. There are TONS of tutorials on making these using fitted sheets over box springs, but this bed didn't need a box spring. So, I improvised.


On a flat surface, cut the blot down 1 of the sides. I had to do it in a couple of sections because the bolt was too thick. This will give you a rectangle or squares depending on the width of your bolt. Either is fine.  If the tulle doesn't cut evenly or is zigzagged by your scissors, it's fine - they all get bunched together so you can't tell anyway.

Next lay out your rod so you have room to tie knots of tulle. Tie knots down the rod. The biggest challenge of this is finding a way not to flatten your tulle and giving you room to stretch out the rod as needed. I ended up using our baby gates while the twins were napping.  

Now, just keep tying knots of tulle...over and over...until you reach the length you need. Insert tension rod underneath bed. If you don't have a place for both ends to line up, consider using cable ties. We had to do this on one end because the post on the foot board was curved on the inside, so we cable tied it to a plank.

Once rod is secure fluff out pieces of tulle. I also had to trim about 5 inches off the bottom because I made it too long.


Chalk Painted Distressed Furniture


I dreaded doing this project, but it was SO EASY. And didn't take nearly as long as I anticipated. First, I made my own chalk paint because the finish was so smooth that I needed something with some grit to attach to the slick finish, but wanted a distressed look for Momo's vintage nursery.  I purchased some wax from Lowe's at the suggestion of the paint counter man, but it turns out it messed up what I was going for. I didn't even need wax or varnish for this project - just the homemade chalk paint and some spray gloss I used as a sealer.

Chalk Paint Recipe:
For the chalk paint, mix 2 tbsp water with 2 tbsp plaster of paris. Then, mix in two cups of paint. I can't stress that you follow the steps in order enough - I ruined some paint trying to mix the stuff in the paint without mixing together first.

Then, I painted - not loading my brush with paint - just a little at a time to make sure I could see a smidge of the original finish through some of the strokes.  And that was it. No more coats were needed. So I sprayed with my gloss and was done!  The photo below is really the only comparison photo I have. The furniture had a pink tint to it, but not quite a nursery pink. And, Mo's room was going to be blue and white anyway.

The tops of the chest and nightstand are a light gray. The original colors had a very dark mauve/grayish color on top and in a laminate material. I thought a little gray would be needed to cover, but in truth I think the chalk paint in white would have been thick enough. But I like the contrast, so I used the gray. It is plain Behr paint + primer from Home Depot - no chalk added and it worked fine. I did two coats of it though because I wasn't really going for distressed look on top and wanted to cover that mauve color pretty well.


The light in this shot above makes it look pink, the shot below of the nightstand is a pretty accurate representation of the color.


Friday, July 18, 2014

Crib Spring Photo Board

So this turned out better than I expected. This is the spring from MK's crib. She recently went into her really big girl bed, and didn't need this. I was in the middle of redoing each twins' room because we separated them and was looking for things I could repurpose. I remember seeing Pinterest post for reusing a crib spring, and I think it turned out pretty decent. It's a large piece, so it works best for a room with large walls I think. It over powered Mo's little room in my opinion.

All I did was wrap burlap ribbon around the edges since her room is already brown, cream and pink. The clothespin letters were part of a gift from my awesome and crafty friend Trista. I had to split the gift she originally made for MK and use the wired frame for Mo's room, but I kept the letters for the crib spring.

I only used a couple of glue dots to attach the burlap to the frame - it didn't need a lot of adhesive surprisingly.


Repurposed Canvas

So this was super easy. I had a canvas that I had repurposed already for the twins' gender announcement and it hung in their nursery. It came time to split them recently, and since they would be separate, I couldn't decide who would get the hanging. No one, I decided and switched it to Mo's room. I took off the burlap, used spray primer on it so the original canvas art didn't show through the white of the chevron, and covered with outdoor chevron fabric. I then used a staple gun to attach a paper-mache letter from Joann's (after painting it with Sky Blue spray paint from Michael's). I love it!


Thursday, June 12, 2014

Books on Strings

I've pretty much put a toy strap on every toy that we take on the go with us,but couldn't figure out how to do small board books...until the other day! I got my sweet husband to drill holes big enough for binder rings to fit through, and then I snapped a toy strap to it. And now, no more throwing books! FYI you will need at least 1-1/2 inch rings so the pages open. Also, you'll want to drill as close to the corner as you can so the pages open as wide as possible.


Friday, May 23, 2014

DIY Wooden Picture Frame

I love this one. I spray painted, added a VERY large binding clip with Loctite super glue gel (which is the BEST - I never use hot glue anymore thanks to this stuff. Pricey when compared to hot glue at first, but uses less and far less messy). The wood was leftover from another project.

Then used some stencils and my Sharpie paint pen for the words. Can't wait to put a pic in it!

Toy/Pacifier Clips

Believe it or not, this was super easy. The cost was about $1 as opposed to $5+ at the stores. I had some old ribbon, Heat and Bond i used for other projects, and just bought some suspender clips at Hobby Lobby. I use these to clip everything to my twins. Also helps keep my 2yo from taking their toys as easily.

Instructions:
  1. Cut Heat n Bond a little less than width of ribbon. Thread ribbon through suspender clip pulling about an inch of ribbon through that you will use to fold over. 
  2. Place Heat n Bond strip under suspender clip so it is in between two sides of ribbon
  3. Place ribbon in flat iron to activate Heat n Bond and adhere the ribbon together, securing the suspender clip. 
  4. Let cool to harden

Tuesday, May 20, 2014

Painted Wipe Containers

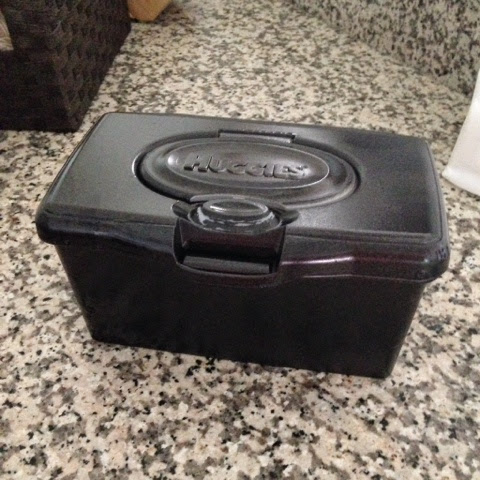
I know this seems strange, but with three kids in diapers, the wipe containers have become standard decor in our house...and they just don't match. I decided to see if I could spray paint them, and while I am sure there are better ways to do it, I think they turned out OK. They don't bother me nearly as much. 

I used Rustoleium venetian bronze on these to blend with our decor. I used painters tape to cover the part where the wipe would be brought through the container so it didn't get any residual goop from the spray paint.  Took a while to dry, but it's functional and doesn't scream "hey I don't belong here!"


Sunday, May 11, 2014

Things I Love Repurposing

1. Archer Farms (Target brand) spice jars into flower bud vases

2. Baby formula containers to dry goods storage containers (flour, sugar, etc.). Also great for craft and art supplies. I'm sure I've saved at least $100 on baking/craft/art storage. At least I tell myself that to make the enormous amount of formula for two babies not seem so painful :)

3. Coffee creamer bottles. Great for Cheerios, Goldfish, etc. I also use them for things I pour a lot - sugar, Splenda, etc.

4. Baby wipe boxes for small item storage in pantry, utility drawers, etc.

5. Small jars (pimento cheese, capers) make great jars for my homemade essential oil creams and body butters. Just make sure to store in a dark place since they aren't dark glass.

6. Soup cans make great holders for utensils for parties (that you can make to match decor), art supply holders (make sure no sharp edges for little ones), and sometimes a cute flower bud vase if you have a lot of them.

7. Candle jars also make great holders for art supplies like brushes, and make up brushes. And, yes, I am that OCD that I have a brush for each shade and have them labeled. 

8. Spray bottles. I hoard these like crazy to make my own cleaning products, outdoor sprays to ward off bugs. I save all little ones too for travel sized whatever I may need.

9. Gelato containers. These make great travel snack jars. Wide enough for little hands (and big hands too), sturdy enough to keep snacks from getting squished, and fit in some cup holders. Also acts as it's own bowl. Gives me a great reason to keep chomping on my sea salt caramel gelato!


Wednesday, May 07, 2014

Lavender Sugar Scrub


2 cups of sugar
1/4 cup of lavender baby wash

Mix in bowl, pour in jars. Sugar will absorb liquid.


Monday, May 05, 2014

2-4-6-8 Who Do We Appreciate?

TEACHERS!! Bits' MDO had teacher appreciation week this week, so here's what we came up with...

Monday - Shower w/ Flowers
Each student was supposed to bring a flower for their teacher. We used a bookmark clip to hold flowers to a piece of cardstock.


Tuesday - Sweets for Sweet Teachers 
The teachers shared a list of their faves, so we put in a mason jar, used a chalkboard tag from Michael's, and a cupcake liner on top to pretty it up.

Wednesday - Teacher luncheon


Thursday - Gift Day


Friday - Favorite Drink Day


Sunday, May 04, 2014

Red Sticks & Blue Jars

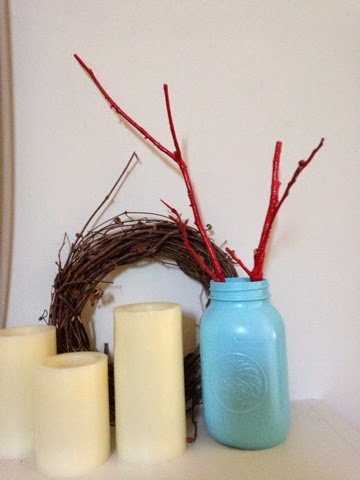
My jury is still out on how they look on my mantel, but individually they looked interesting enough to post. Sticks are spray painted bright red with gloss paint.


Tuesday, April 22, 2014

Repurposed Mini Chalkboard

So I got this cute chalkboard thing from Michael's but turns out it wasn't made to be used with chalk markers (irony). I used them on it, and it stained the board. So, I painted over it, added clothespins and turned it into a double photo frame for Instagram pics. I love it :)


Saturday, April 19, 2014

Outdoor Chalkboard


$10 chalkboard from Home Depot, primer and clear coating to help seal the back from water, and nails makes for a fab outdoor chalkboard. No inside mess, and daddy even added a nail for her to hang her chalk basket. Not sure how long it will last being exposed to the elements, but I think we will at least get $10 worth out of it. 

You can find the chalkboard where they sell pegboard.